LivaChat Laravel LiveChat Application
App Settings
- General Settings
- SEO Setup
- Google Analytics
- Custom JS & CSS
- Captcha Settings
- Email Settings
- Security Settings
- IP List
- Bot Response Setting
1. General Settings
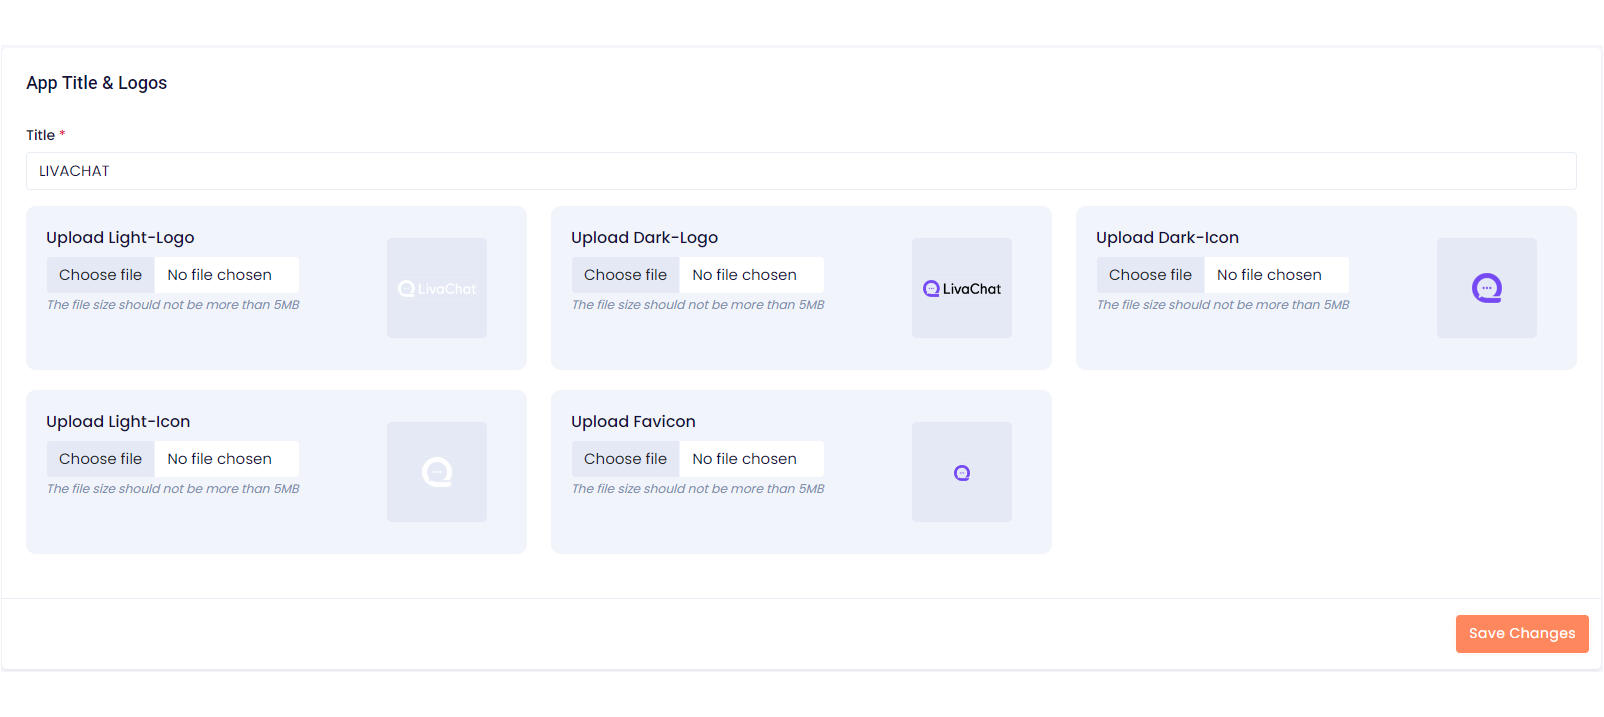
How to Setup “App Title and Logos”?
- Title : It’s the main title for the application. You can set the application's main title here by filling in the below input field with the "Title" name.
- Upload Light-Logo : You can upload your own branded "light logo" to be displayed at the top of the vertical side menu bar. This customization allows your application's interface to reflect your brand identity.
- Upload Dark-Logo : You can upload your branded "dark logo" to be displayed on the login form of the application, ensuring your brand identity is reflected during the login process.
- Upload Dark-Icon : You can upload your branded "dark icon" to be displayed in the mobile view of the application, ensuring the icon is visible when the window size is minimized to mobile dimensions.
- Upload Light-Icon : You can upload your branded "light icon" to be displayed when the side menu bar is collapsed or closed, ensuring consistent brand visibility.
- Upload Favicon : You can upload your branded "favicon" to be displayed in the browser tab, ensuring consistent branding in the application’s title area.
Note :Please click on the “Save Changes” button after uploading the title, logos, icons, and favicon.
How to change the primary and secondary colors of the application globally?
-
Color Setting : Navigate to
Admin panel->App Setting->General Settings. You can update the "Primary and Secondary" colors of the application according to your choices with this setting. - Primary Color : To change the primary colour of your application, please click on the (RGBA) "Primary color" input field and set the color of your choice, then click on the "Save Changes" button to see the change on the application globally.
- Secondary Color : To change the secondary colour of your application, please click on the (RGBA) "Secondary color" input field and set the color of your choice, then click on the "Save Changes" button to see the change on the application globally.

How to change the language and version (LTR to RTL) of the application globally?
-
Global Language Setting : Navigate to
Admin panel->App Setting->General Settings. With this feature, you can change the application's "Language and Version" (LTR to RTL) according to your choices. - Language & Version : Here, by default, we provided a total of fifteen languages. For example, if you select the Arabic (AR) language from the language dropdown, then the whole application will convert into the Arabic language as well as change the version from LTR to RTL.
Note : Please click on the “Save Changes” button after selecting the language.

How to change the Date and Time Formats of the application globally?
-
Global Date & Time Format: Navigate to the
Admin panel->App Setting->General Settings. You can update the "Date and Time" formats of the application according to your choices with this setting. - Select Date Format : To change the date format of your application, please click on the "Select Date Format" dropdown and set the "Date Format" according to your choice, then click on the "Save Changes" button to see the change on the application globally.
- Select Time Format : To change the time format of your application, please click on the "Select Time Format" dropdown and set the "Time Format" according to your choice, then click on the "Save Changes" button to see the change on the application globally.

How to use Two Factor Authentication Settings?
-
Two Factor Authentication Settings: Within the
Admin Panel -> App Settings -> General Settingspage, the "Two Factor Authentication Settings" section allows administrators to configure authentication options for employees. - Configuration Options:
- Two toggle switches are available:
- "Enable Employee Google Two Factor Authentication": Enables Google Two Factor Authentication for employee logins.
- "Enable Employee Email Two Factor Authentication": Enables Email Two Factor Authentication for employee logins.
-
Overview:
- "With these settings, administrators can enhance security by enabling Two Factor Authentication (2FA) methods for employees.
- "Google Two Factor Authentication utilizes Google Authenticator or similar apps to generate authentication codes.
- "Email Two Factor Authentication sends a verification code to the user's email address for login confirmation.
- "Administrators can tailor authentication settings based on the security requirements and preferences of their organization and users.

How to use Security controls Settings?
-
Security Settings: Located within the
Admin Panel -> App Settings -> General Settingspage, the "Security Settings" section offers administrators control over specific security measures to safeguard the application. - Configuration Options:
- This section features two toggle switches:
- Right-Click Protection: When enabled, users are prevented from accessing the right-click context menu within the application, enhancing protection against unauthorized actions.
- Text Selection Prevention: Enabling this setting disables users' ability to select and copy text from the application, thereby safeguarding sensitive content.
-
Overview:
- These security settings provide administrators with tools to mitigate risks and protect sensitive information within the application environment.
- "Right-Click Protection" helps prevent unauthorized actions or data extraction by limiting users' access to context menu functionalities.
- "Text Selection Prevention" enhances data security by restricting users' ability to copy and extract text, minimizing the risk of unauthorized data replication or misuse.

How to use Session Timeout Settings?
-
Session Timeout Settings: Found within the
Admin Panel -> App Settings -> General Settingspage, the "Session Timeout Settings" section empowers administrators to manage session durations for both admin panel users and customers, enhancing security and privacy. - Configuration Options:
- This section comprises one toggle switch and corresponding input field:
- Admin Panel Users Session Timeout: When activated, admin panel users will be automatically logged out after the specified session time, as set in the "Session Timeout In Minutes" input field. This feature enhances security by mitigating the risk of unauthorized access.
-
Overview:
- The "Session Timeout Settings" provide administrators with granular control over session durations, aligning with security best practices.
- Admin panel users benefit from enhanced security and privacy, as sessions automatically expire after the specified timeout period, reducing the risk of unauthorized access to sensitive data.
- Configurable session timeout settings allow organizations to tailor security measures to their specific needs, promoting a secure and user-friendly experience for all users.

How to setup application global settings?
- App Global Settings : A clear explanation is given for each and every concept in this setting as shown in the below image.

How to change footer text?
-
Footer Copyright Text : Navigate to
Admin panel->App Setting->General Settings. Using the summer note editor, you can change the applications' footer text. As shown in the below image, - If you don’t want to display any content in the footer section, please leave it empty.

Note : Please click on the “Save Changes” button after customizing the footer text in the summer note.
3. SEO Setup
How to setup SEO setting?
-
SEO Settings : This web application also provides you with SEO (search engine optimization) settings. To setup SEO, navigate to
Admin Panel->App Setting->SEO. This SEO setup comes with three input fields. 1. The author, 2. The description, and 3. The keywords. Fill out those three input fields so that you can increase the traffic for the application.
4. Google Analytics
How to track the application’s activity using Google Analytics?
-
Google Analytics : Basically, "Google Analytics" is used to track and monitor the application’s activities and the flow of traffic. To use the "Google Analytics" setting in the application, go to
Admin Panel->App Setting->Google Analytics. Now click on the toggle switch button of "Enable Google Analytics" to enable and type the "Tracking ID" in the input field and click on the "Save Changes" button to apply the changes.
5.Custom JS & CSS
-
Custom CSS and JavaScript : This feature is used to customize the "CSS and JS." To use this feature, navigate to
Admin Panel->App Setting->Custom CSS and JavaScriptand follow the below given instructions. - Custom CSS : Now you can customize your application styles by using custom CSS. And please do not use any tags, ex: , while writing CSS code.
- Custom JS : Now you can customize your application JavaScript by using custom JS. And please do not use any tags, ex: , while writing JS code.

Note : Please click on the “Save Changes” button after setting up your custom CSS and JS. .
6. Captcha Settings
How to setup Captcha setting?
-
Captcha Settings : This setting protects against any system-generated attacks like DoS attacks. To use this setting in the application, go to
Admin Panel->App Setting->Captcha Settingpage. - Captcha Disable : Both manual and Google reCaptcha settings are deactivated or disabled by default in the application. Two captchas cannot be used at the same time.
- Manual Captcha Enable : To enable "Manual captcha" in your application, simply click on the switch button. However, if you use manual captcha, the other one, "Google reCaptcha," will be automatically disabled.
-
Google Captcha Enable : If you want to use "Google reCaptcha," you must first configure Google reCaptcha's settings and get the "Site Key" and "Secret Key." Please visit the official site to create those two keys: https://www.google.com/recaptcha/admin/create and follow the instructions as given.
Assuming that you have generated a "Site Key" and a "Secret Key". Now copy those two keys and paste them in the input field of "Google Re-Captcha Setting" and click on the "Save Changes" button. To use Google reCaptcha in the application, please enable the “Google Captcha Enable” toggle switch button from the above section.Note: Please use only "reCAPTCHA v2" to generate "Site Key" and "Secret Key". -
Captcha Setting in Forms : You must enable the switch of the form as shown in the below image if you wish to use one of the above two, "Manual Captcha" or "Google reCaptcha" in them.

For example, if you want to use manual captcha in the above-mentioned form, you must first activate the "Manual Captcha Enable" switch button from the above section, then enable the switch button of the forms where you want to use manual captcha.
8. Email Setting
-
Email Setting : This settings page serves the purpose of facilitating the sending and receiving of emails within the application, encompassing SMTP/Send Mail and IMAP configurations. To set up these parameters, kindly go to the
Admin Panel->App Setting->Email Setting, and finally access the Email Settings page. Follow the outlined process to configure the settings accordingly.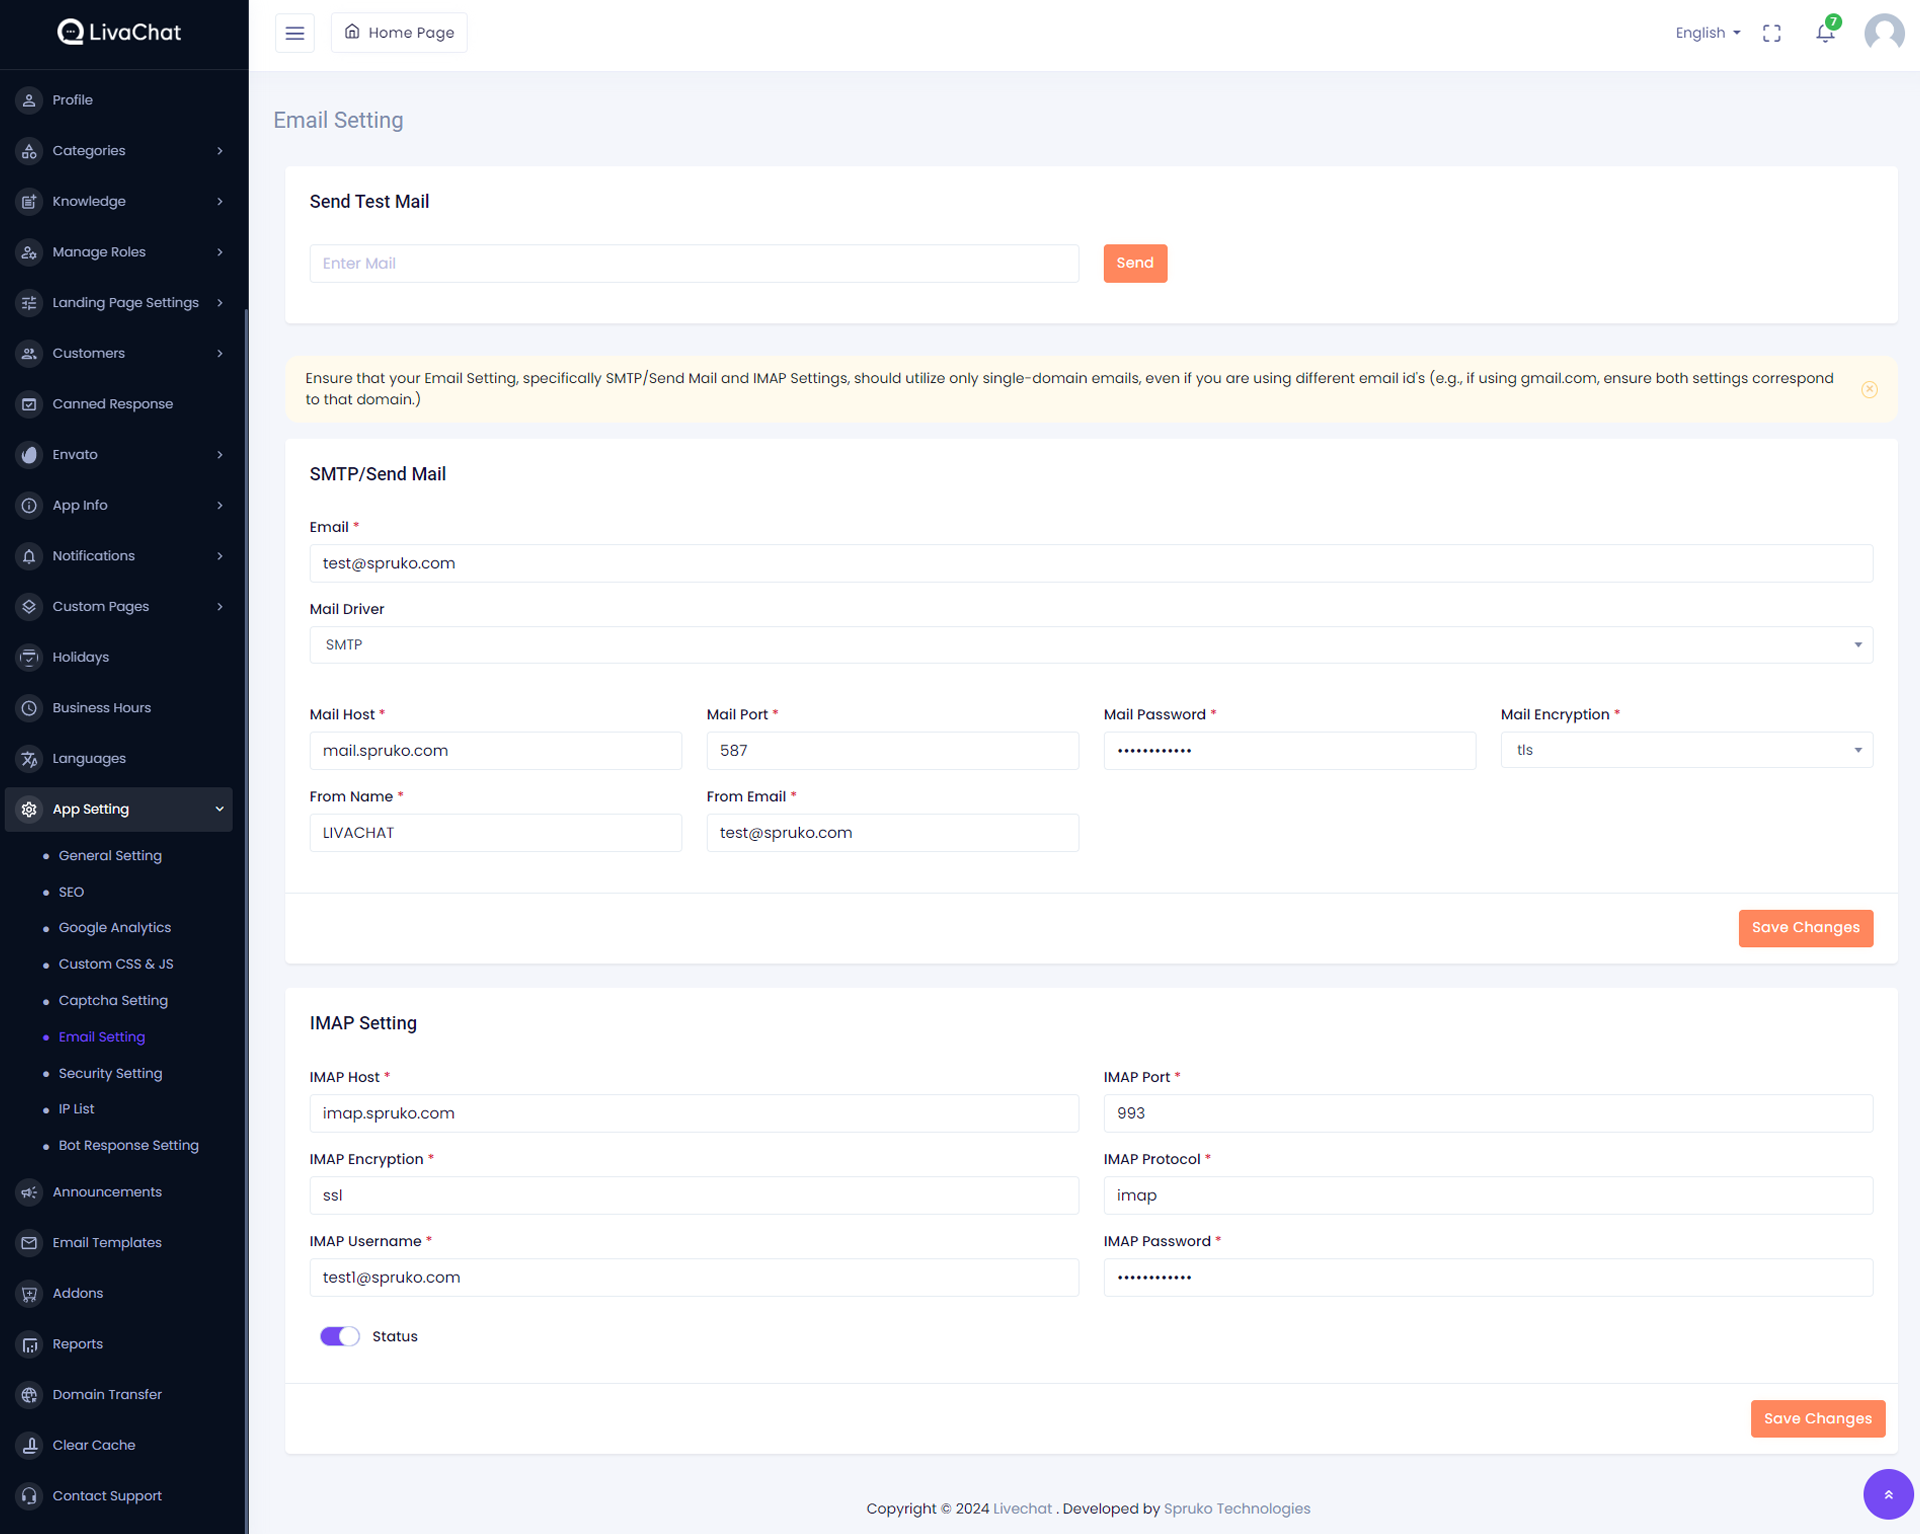
-
Send Test Mail : The application offers a valuable feature called "Send Test Mail" that allows you to preview how your emails will appear in your customers' inboxes. To utilize this option, start by completing the necessary details in the "SMTP/Send Mail" section provided below. Once you've filled out the required information, you can easily use the "Send Test Mail" option to access the email's presentation.
Now please enter a valid email address in the input filed and click the "Send" button to test the "Send Test Mail" option.

- SMTP/Send Mail : SMTP/Send Mail offers two choices: "Sendmail" and "SMTP." You have the flexibility to opt for either option, but it is essential to configure the details based on your host server or the specific single-domain emails you are utilizing.
-
Sendmail : If you opt for the "Sendmail" feature, ensure that the provided details align with those of the host server where your application is hosted. Input the relevant information for "Sendmail" as provided by your hosting provider. Once entered, click on the “Save Changes” button to implement the updates and activate this functionality.
Note: Please be aware that when utilizing the "Sendmail" option, there is no requirement to input values in the "Mail Username" and "Mail Password" fields. - SMTP : If you are using the "SMTP" option, then you need to fill out all the input fields in the "SMTP" form to connect with the host that you wish to use in the application.
- To set up server SMTP settings. Please follow this guide, or for reference video click here.
- To set up Gmail SMTP settings. Please follow this guide, or for reference video click here.
-
Cron Jobs : You must run the cron command on the cPanel server to make all automatic functions, such as "Auto-Close Ticket," "Auto Notification Delete," "Auto Overdue," "Auto Response," and "Email to Ticket."
Example :To run the cron command on your server, login to your cPanel server, scroll down and navigate to Advanced->Cron Job, and go to "Add New Cron Job" and select the "Once Per Minute (*****)" option from the "Common Settings" dropdown, and type the below command in the "Command" input field, and click on the "Add New Cron Job" button. If the process is done in the correct way, then you’ll get a message that says "cPanel successfully added the cron job".Example Command :cd /path-to-your-project && php artisan schedule:run >> /dev/null 2>&1Note :Automatic functions of the application will not work unless you run the above cron command on your server.Please follow this guide, or for reference video click here


Let’s first understand what is IMAP?
IMAP (Internet Message Access Protocol) allows you to use a range of devices to access email stored on a server. Your hosting server must have an email plan that supports IMAP in order to use IMAP email.
10. Security Setting
-
Security Setting : In this application, we implemented three different types of security settings: "Country Block/Unblock", "Admin Country Block/Unblock", and "DOS Attack". And they are unique in their functionality. To use this setting, navigate to the
Admin Panel->App Setting->Security Settingpage and follow the below process. -
Country Block/Unblock : This setting is used to "Block" or "Allow" countries from accessing the application of the main site URL: https://app.spruko.com/mydesk, which is on the visitor's side.
If you want to "Block" or "Allow" a country or multiple countries, then click and select the countries from the "Select Country" dropdown and click on the "Save changes" button to block or allow the countries you selected.

By default, all countries are allowed to use the application. If the "Select Country" dropdown is left empty, then any country can access the application's main site URL: https://app.spruko.com/mydesk.

-
Admin Country Block/Unblock : This setting is used to "Block" or "Allow" countries from accessing the application of the admin URL: https://app.spruko.com/mydesk/admin, which is on the admin side.
If you want to "Block" or "Allow" a country or multiple countries, then click and select the countries from the "Select Country" dropdown and click on the "Save changes" button to block or allow the countries you selected.

By default, all countries are allowed to use the application. If the "Select Country" dropdown is left empty, then any country can access the application's admin URL:https://app.spruko.com/mydesk/admin.

Note: You are not allowed to block your own country. - DOS Attack Setting : This setting secures the application from denial-of-service (DoS) attacks.
-
You have two input fields in the DoS attack setting. The first input indicates "Attempts" and the second input indicates "Seconds." For example, if 10 "attempts" in 30 "seconds" come from a particular IP address, then that IP address will be blocked or the user may be redirected to a captcha page, depending on the option you choose.
Example: First enable the toggle switch button, choose the "View Captcha" option from the "DOS Attack Setting" section and set 10 in the first input field ("Attempts") and 30 in the second input field ("Seconds") and click on the "Save Changes" button. If a user tries to access the application 10 times in 30 seconds, his or her IP address will be temporarily blocked and he or she will be redirected to the captcha page. Or if you choose "Block IP Address", then it will block the IP address permanently. If you don't want to use this feature, simply click on the above toggle switch button to disable it.
- Domain list : This setting restricts specific domain emails solely for guest users.During the initial chat interaction when collecting basic customer details, users from the restricted domain will not be added to the customer list.
-
You have to give the list of allowed domain's or list of blocked domain's by coma(,) saperated values. This will block or only allow the specified domain's

How do I set up DoS attack settings and get a basic overview?
How do I set up Domain List and block some particular domain's
11. IP List
-
IP List : All temporary and permanently blocked IP addresses are displayed in the "IP List" table, and you can also add IP addresses manually by clicking on the "Add IP Address" button in the "IP List" table.
When you click on the "Add IP Address" button in the "IP List" table, a modal pop-up will appear with the "IP" input field and "Type". Fill in the input field and select the option from the "Type" and click on the "Save" button to apply the changes.


- Unlock : You can "unlock" and make the IP addresses normal so users can access the application.
- Lock : You can "Lock" the IP addresses and make users to access the application temporally with captcha.
-
Block : You can "Block" IP addresses, and users won't be able to access the application permanently until the IP addresses are "unlocked."
Here there are three more options. Edit, Delete, and Reset in the “Actions” column on the "IP List" table.
- Edit : By clicking on the edit option in the “Actions” column you update the IP addresses using the above options.
- Delete : You can also delete the records of IP addresses permanently. So that users are allowed to access the application.
-
Reset : You can also reset the IP addresses. It works the same as the unlock option so that users are allowed to access the application.
Note :Please click on the “Save” button after you add or edit the IP addresses.
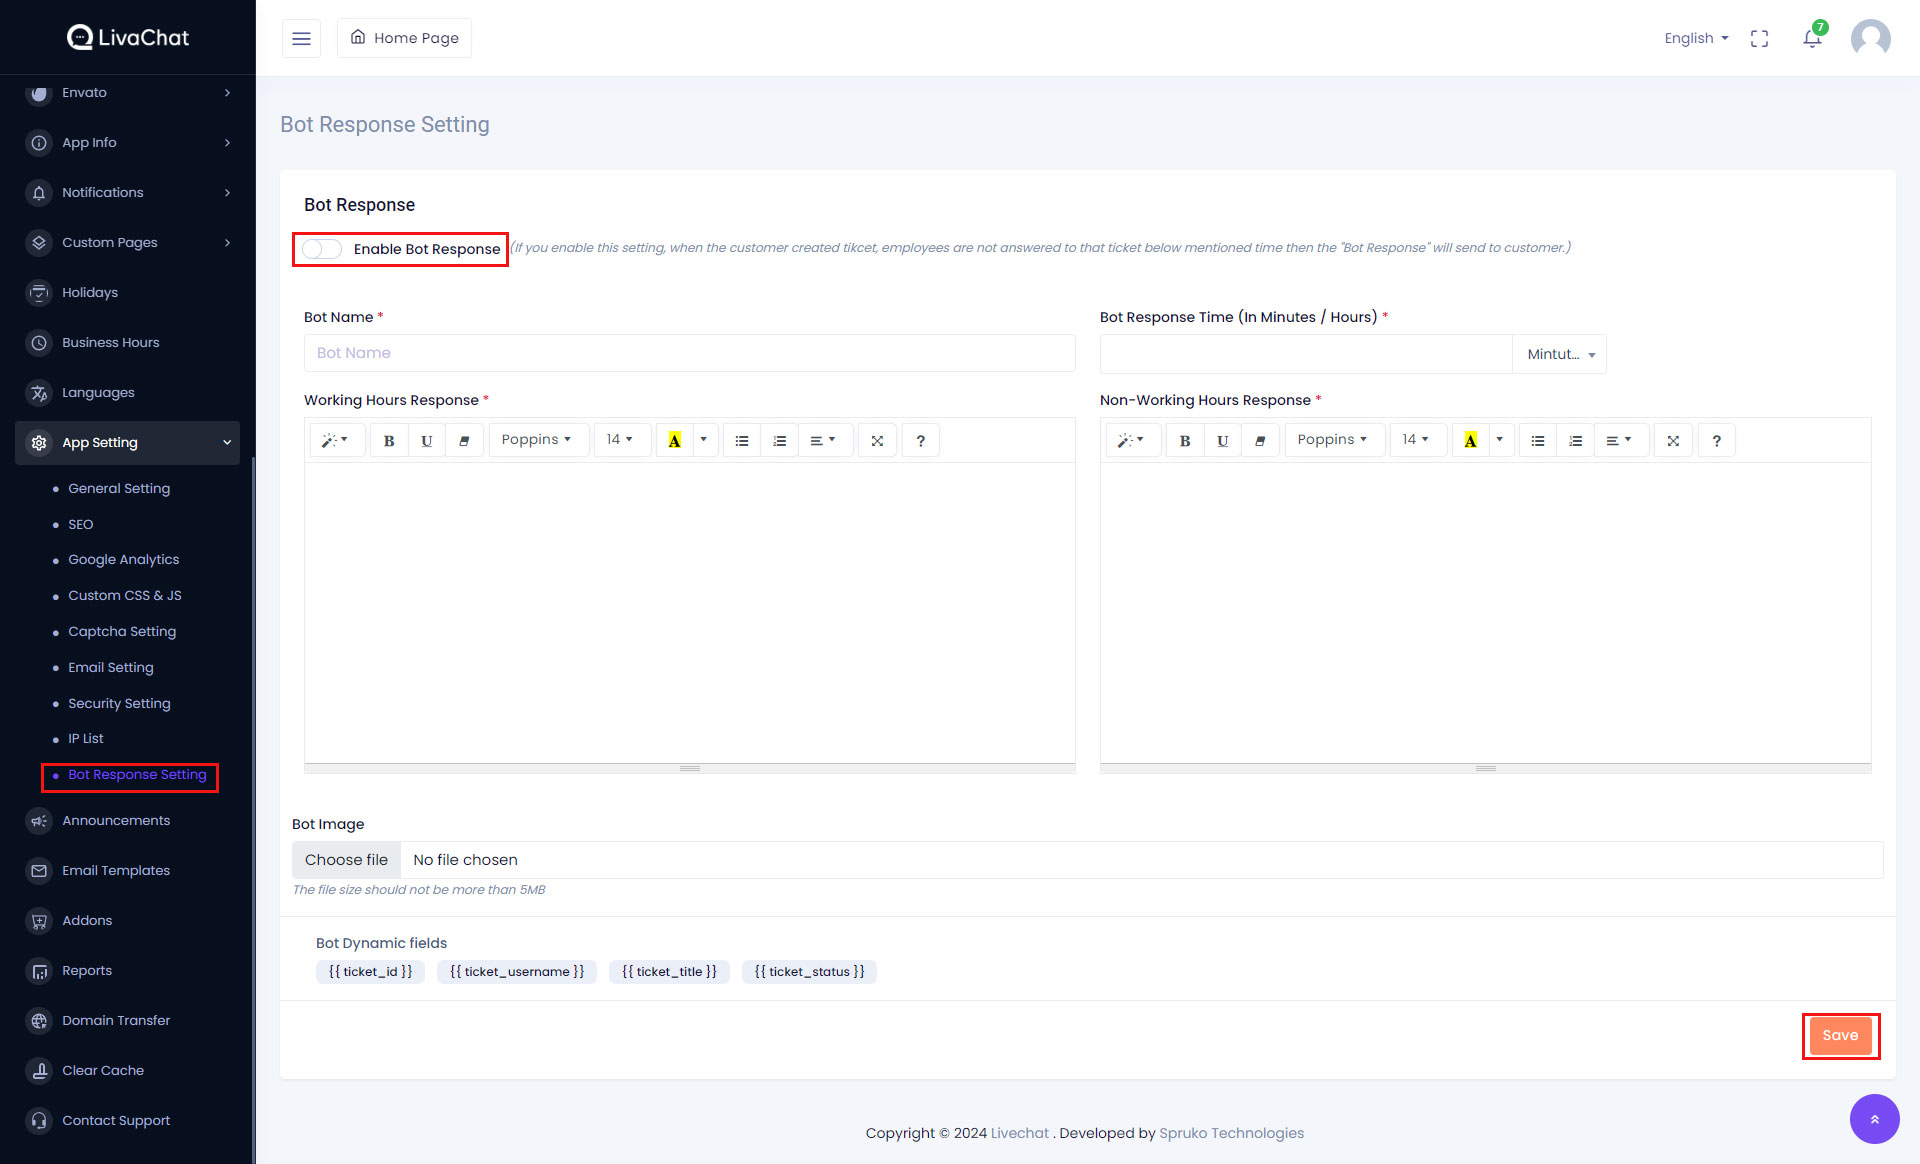
12. Bot Response Setting
-
Introduction: The "Bot Response Setting" feature has been implemented, empowering superadmins to establish response times for automated bot responses. The bot generates predefined responses if agents fail to respond within a specified time during working hours, with separate configurations for non-working hours.
-
Configuration Steps:.
Functionality Overview:.
- To utilize this feature, navigate to the
Admin Panel -> App Settings -> Bot Response Settingpage. - Toggle the "Enable Bot Response" switch and click on the "Save Changes" button at the bottom right corner to activate the feature. If enabled, when a customer sends their initial reply to a ticket and employees fail to respond within the specified time, the bot generates a response.
- Fill in the following details:
- "Bot Name": Provide a name for the bot.
- "Bot Response Time (In Minutes/Hours)": Set the time frame within which the bot response will be triggered.
- "Working Hours Response" and "Non-Working Hours Response": Customize the response messages for working and non-working hours, respectively.
- "Bot Image": Optionally, upload an image for the bot.
- Utilize dynamic variables like "{{ ticket_id }}" to display actual content dynamically.
- During business hours, if the customer sends their initial reply to a ticket that remains unanswered by agents, the bot will respond with the message specified in the 'Working Hours Response' within the defined response time.
- During non-working hours or during holidays, the bot will send the message specified in the "Non-Working Hours Response" within the specified response time.
- Ensure that configurations align with business hours and holiday settings for optimal automated response management.
- To utilize this feature, navigate to the